Thursday, March 20, 2008

How to get (and get rid of!) drag handles in families

So we'll stay on the topic of family editing once again...

One of the first valuable lessons I learned in family editing is that you can make a family (in the project environment) display drag handles in order to resize it interactively without having to visit the dreaded Properties dialog. And who wouldn't like that?! The concept is very easy:

a) In a family template (let's pick a Generic Model), create an additional Reference Plane parallel to the Center (Left/Right) plane. By default, this will come in as a Weak Reference. We'll leave it alone for now.

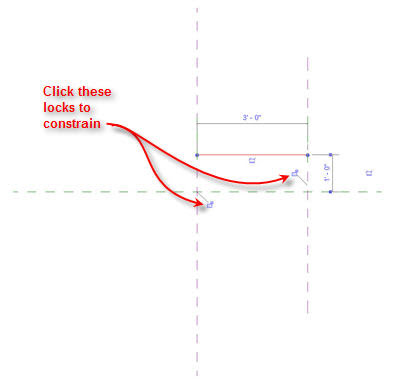
b) Create a symbolic line from the Center ref. plane to this new ref. plane.

c) Now select the symbolic line and notice two open padlock icons at each end where they coincide with the ref. planes; click on them to lock the constraints.
d) Add a dimension between the two ref. planes. Now select the dimension and on the Options bar, click the Label drop down and select "Add parameter".

e) Type a parameter name and select a group. These are not really important for this example. What is important is that we make this an instance parameter. For the sake of this example, let's call it "Length".

f) Load the family into a project and place an instance. Select the instance and you'll get the following:


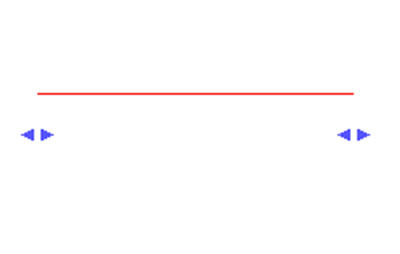
When you push or pull on the drag handles, the length of the line changes. We're basically modifying the instance parameter in the family that we called "Length" without having to visit the properties dialog box. You can also use the align tool and it would find the references within the family and resize the line accordingly.

Now what if you don't want the drag handles? You have a couple of options:

a) Make the "Length" parameter a Type parameter.

b) Change the ref. planes in the family to "Not a reference".

Both these will achieve the desired result, but are not always viable. If you want to keep the parameter as an Instance one, then (b) is probably your best course of action. But once again, what if you want to use the align tool to move the family in alignment with something else? If you set the reference plane to "Not a Reference", the align tool will not "see" these planes in the project environment.

So here we come to the last tip (and the real purpose of the post). Let's go back to the family. We're going to combine option (b) that we just discussed with another little trick. So we have two references which can be seen by the align tool in the project environment: a "strong" reference, which is the "Center (Left/Right)" and the weak reference we drew initially. Let's draw two new ref. planes and make them "Not a Reference". Now we lock the symbolic line to these new ref.planes. Place a dimension between the original ref. planes and the new ones and you'll have the following:

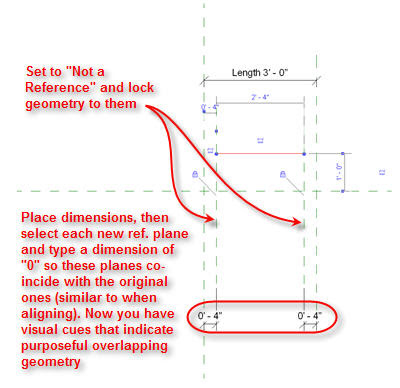
One other crucial step is to edit the witness lines of the label to assign them to the new ref. planes. Alternatively you can delete this label, place a new dimension and re-assign the label. Whichever way you choose, continue the following steps before re-assigning the label. Now select the new ref planes and the dimensions will turn blue; type in a length of 0 and the ref. planes will overlap. We could have aligned and locked these ref. planes, but then you wouldn't really know you have overlapping elements. This is just the method I choose so it's clear that I'm purposely constraining overlapping elements (not everyone knows to turn on automatic sketch dimensions!). Finally, re-assign the "Length" label.

When you load this family back in the project, you'll find that you can still use the align tool, but now the whole object will move as a whole rather than resize. To resize, you'll simply go to the Properties dialog and change the instance parameter value. Where do I use this technique? Door families are the prime example. We like to have instance widths for doors, but we couldn't use the align tool as it would resize the door instead of moving it. This technique enables us to have it both ways ;) Hope you also find it useful in your family building endeavors.


Share/Save/Bookmark

Tuesday, March 11, 2008

Built-in dimensions in Family templates

Here's a quick one.....

So you've probably built a few families and noticed that some dimensions and reference planes that are part of a template cannot be deleted (ex: the EQ constrained dimension in the casework family template). There's really not much you can do about them. You could move them to the side and ignore them. But when it comes to labels/dimensions, there are a few options at your disposal:

a) You can use the dimension/label and re-assign it to another label. "Oh, really clever Dave, I knew that!". Ok granted that might be obvious, but it's amazing how many times users overlook the fact that they can do just that. Using the casework template as an example, you're able to delete the center ref. plane, thus turning the EQ constrained dimension into a regular dimension. Now you can assign it to any length parameter of your choice.

b) If the center ref. plane couldn't be deleted in this case, you could create a new ref plane or a line, and edit the dimension's witness lines to reference your new ref. plane/line. Since you can delete this ref. plane/line and dimensions cannot exist without the referencing element, this seemingly "undelete-able" dimension is forced to go away. There, you out-smarted Revit!


Share/Save/Bookmark

Friday, March 7, 2008

Switching Detail Lines & Model Lines

So I just read a great tip posted on Steve Stafford's Blog, originally posted on the AUGI forums, and I had to link to it. This ties well into the discussion I posted a while ago regarding the differences between Detail Lines & Model Lines. You never cease to learn!


Share/Save/Bookmark

Saturday, March 1, 2008

Streamlining Local File creation

Creating local files for workset-enabled projects can be confusing to users and is quite an unelegant task. A while back I started a thread on the AUGI Revit forums titled "Transparent Local file creation". Thanks to AutoHotKey, I was able to come up with a nice, automated way to help teams working on workshared projects get started every morning in a consistent and easy way.

Since then the thread has had over 2,400 hits and numerous users have contributed to the ideas and solutions of this script. Today I finished version 2 and decided to post about it here. If you like what you see, go to the thread above (or click here) and download the script. I hope it will be as useful to you as it has been to me and a lot of AUGI members. All you need to do is to place a copy of the exe file (compiled version of the AHK script) in the central file folder and have team members create shortcuts to this file on their local drives (the Desktop is ideal). Then just double click the shortcut and wait until it's finished doing it's magic!

-------------------------------------------------------------------------------------------------

The script will do the following:


1) Check if the Central file exists. Filename is assumed to be XXXXX #VV central.rvt, where XXXXX can be anything of any length, # is the discipline (A, S or MEP, where the 3 letters in MEP can be expressed in any order) and VV is the version number (since we’re on 2008, we would use 08, but the script doesn’t care about this and you could in theory type anything). The spaces shown in the filename can be any character you want, including a space. So 123456789 Project_A08-Central.rvt would work the same as 123456789-Project-A08_Central.rvt (you get the idea).

2) If no Central is found or more than one exists, dialog warnings will be issued. The Central file folder will open in Explorer so you can investigate the problem immediately.

3) The discipline is evaluated (from # above) and if the input is not as expected, you will be warned and the script will terminate. The Central file folder is opened in Explorer so you can investigate the problem immediately.

4) Local files will be created in C:\Revit Local Files\XXXXX #VV\ so if the folder does not exist, the script will create it. It will also automatically create backups of your local files just in case you might need one (like if the Central becomes corrupt). So first it will delete the last backup and place it in the Recycle bin (it will stay there until you empty your trash). Then it renames your local file and appends “_BAK” to the filename, copies the Central file to this folder, and removes “central” from the name and replaces it with your Windows username (Ex: 123456789-Project-A08_DBaldacchino.rvt).

5) Check if the required Revit flavor is installed. If not, it will give you the option to open the file with the Revit flavor you have installed on your PC (Ex: it will use Revit Structure 2008 to open an Architectural file). If no Revit is installed, it will let you know and ask you to contact IT (niiiiiice!), after which the script will terminate.

6) The username in the Revit.ini is deleted to prevent problems down the line (you've all experienced having two people working on a project with the same username and one of them complaining they cannot STC, right?!). This ensures that when Revit opens, the username will be set to your Windows username. If multiple flavors of Revit are installed, only the ini file of the discipline that you’re trying to use will be edited.

7) The script will now evaluate what command line/switch was sent through the shortcut. It recognizes "detach" or "worksets" (not case sensitive). In the "Target" field of your shortcut, leave a space at the end and type "detach" or "worksets". If you type anything else, the script ignores it and opens the local file as if no command was sent. So for example your shortcut target would look like this: "\\servername\Projects\ABC\Central\test_A08-Central.rvt" worksets. In this case, the script will write a custom journal called "select_ws.txt" in your journal folder and fire it up in a new instance of Revit. If the command line parameter was detach, a journal called "detach.txt" would be written and used. The script still makes a copy of the central file as a precaution when detaching. Note that currently there is no way to run a journal in an already running Revit session through AHK, so using one of the two switches will cause a new instance of Revit to open.

8) If there is no command line parameter (or an unrecognized one) in the shortcut, the script proceeds as before. First it checks if Revit is already running. If it is, the session will be activated and the local file will start opening. If not, a new session is fired up and the local file starts to open.

9) When the annoying dialog shows up (that this Central has been copied….), it is automatically dismissed, thus rendering the whole process entirely transparent.


Share/Save/Bookmark