Wednesday, January 27, 2010

Structural Trusses with Extensions

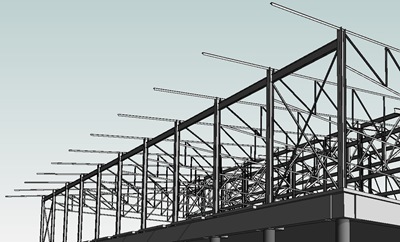
Structural Truss families are quite easy to create: you sketch the top & bottom chords and the webs, and you’re pretty much done. You can obviously constrain the family so it can flex for different conditions, or build a static truss for a particular situation.

Truss Family

If you load structural framing families into it, you can assign them to the Top & Bottom chords and to Vertical and Diagonal webs. If you choose not to do this, you can change them in the type properties later inside the project. But in this case, what will Revit use when you sketch one in the project? The answer is: the last used structural framing family! So if you placed a concrete beam and then you place a truss with undefined members, you get this:

Undefined members

Not exactly what you had in mind, right? However, a quick trip to the Type properties will get you all set in no time. I highly recommend setting the framing members within the family.

It is quite common to have one of the chords extend out past the support and you typically want to see that representation in plan. To achieve this you have to extend the chord member by unpinning it, and then make sure the instance parameter “Stick Symbol Location” is set to the correct Chord (your choices are Bearing Chord, Top Chord or Bottom Chord). Unfortunately it is a tedious process and if you used a beam system to populate your roof structure or placed instances one by one, you have to edit them individually. Talk about time consuming! So the best strategy is to do one truss, extend the chord correctly, group it and then copy or array it around. This way if you need to change the extension, you do it once. So let’s go through the process:

  1. Create a framing elevation and open the view. Extend the crop region where the extension occurs;
  2. Draw a vertical detail line at the required distance. For this example I’m using 10’-0”;
  3. Select the top chord and unpin it. Now use the trim tool to trim the top chord with the detail line. This ensures that the chord stays in the same plane as the truss. If you try extending by dragging, you run the risk of snapping to some other remote object, thus skewing the member;

Framing Elev

Now group the truss, name it correctly and finish by copying/arraying it around. Note that sometimes copying a group like this causes an “edit” to the group due to the attachment points, causing Revit to complain. I found that the best option is to move the grouped truss first so it’s no longer attached to the columns. This still causes an “edit” to the group, but because you still have just one group instance, Revit will allow it. Then copy other instances around and line them properly on the gridlines.3D extended chords

The plan representation is now also correct, with the extensions showing the actual modeled length. Being in a group, you can easily change one instance and all others update if your extension length changes.

Plan extensions

EDIT: For the issue mentioned above regarding copying/arraying, I have found that it is better to group the truss first, and then array/copy. This usually avoids those messages about needing to fix the group since grouping seems to act like a container/wrapper that lets Revit cool off and not think too much about relationships ;)


Share/Save/Bookmark

Wednesday, January 20, 2010

2-Mile Limitation (20 mile in Revit 2011)

This is worth echoing and I posted it on the Tips & Tricks AUGI Forum.

Getting around the 2 mile limitation when linking a CAD file (20 mile in Revit 2011)

DISCLAIMER: Be very careful when doing this as you can see severe display issues. Use at your own risk!

In Revit 2010, if you import/link a CAD file with entities that are more than 2 miles apart at the extremes, you will receive a warning and Revit won't let you finish the process. Basically everything in the file needs to fit on a 2 mile diameter "platter". Sometimes you could have a text attribute that is outside this imaginary circle that causes the issue. This tip has two parts to it: how to get around the limitation and how to clean your file so it works without workarounds.
I've been wanting to test out and write about the workaround for a while but I just came across a very well written tutorial so here it is! Thanks go to tonyisenhoff and phyllisr at EUA who shared this detailed tip here.

The second tip explains how to clean your file. Assuming you have a DWG file & Autocad, and you're sure your geometry fits on the proverbial "platter", do the following:

  1. With the file open, type the command "select" and at the prompt type "all";
  2. Now type "r" to remove objects and window your geometry. By doing this we're creating a selection set of offending objects, which sometimes are invisible. Click/spacebar/enter to exit the command;
  3. Now type "erase" and then at the prompt, type "p" (for previous). This selects the selection set completed in 2. Click/spacebar/enter to exit the command;
  4. Nothing in your file should be outside of the area you windowed, so save the file and link/import again in Revit. No error or warning should show up.

EDIT: As MrJackson commented, it's much easier and faster to hit CTRL-A to select all, then hold SHIFT while windowing the geometry you wish to keep. Then hit the DELETE key.

Also as of Revit 2011, the limitation has now been raised to a hefty 20 miles. Thanks Factory!


Share/Save/Bookmark

Tuesday, January 19, 2010

Stair-Master

Happy New Year! Gosh, I missed giving you all the traditional Holiday wishes and now we’re already halfway through the first month of the year. By now we’ve all made our resolutions and some have already committed to losing weight and getting in shape (yeah rrrright!). So I’ll try redeeming myself by posting about stairs and discuss how I used them recently on a project, and what issues I encountered.

As many others I am now working on billable projects. I love working on projects by the way, but it’s hard to juggle both roles of giving Revit support and being responsible for project delivery, deadlines, etc., especially on projects with tight schedules and low manpower. It’s becoming more common to be asked to do more with less, right? So now a little bit about the project: it was an addition & renovation of a High School stadium which included a new Press Box and ticket booth; an expansion of the Visitor grand stand, toilet facilities and ticket booth; upgrading the existing field-house and building another one; a new 2 story AD’s office and staff development facility; and plenty of site-work, miscellaneous projects and fencing upgrades. Over the next series of posts I plan on posting some tips & tricks learned with regards to sweeps in walls and share the techniques used to do phased site work (existing, demo and new construction). Today I’ll be concentrating on the grandstand structure.

Section When I got started in August, I needed to model the existing concrete structure and decided to try the stair tool for the precast bleachers. I wanted to push the tool to see if I could get the required representation. Here’s a snippet of a structural section drawing. Do you think it’s possible to model this with stairs?

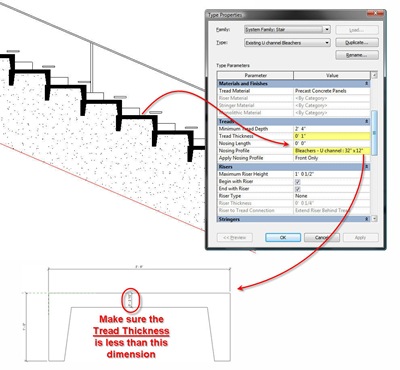
I didn’t think it was, but after playing around a little bit with the Nosing Profile, I was able to get the desired result.

Bleacher section composite

One of the positives of this approach is that now you have a host for your railings, which makes adding intermediate rails and guardrails quick and easy. Using railings, it is also very easy to add steps between the bleacher rows. How? Make steps as balusters and create a railing definition with balusters only, at the correct spacing. You can also extend this idea to the seating but I decided to stick with line-based families in my case (not shown below).

Step railings

Openings One of the problems I ran into is when having to insert openings, such as Vomitory exits (I hate that term!). I was forced to split the grandstands into multiple stair sections. It would be great if the shaft tool was able to cut through stairs.

You probably want to see the stand as a continuous structure in plan, but dividing into multiple stairs results in lines between these segments which you probably don’t want to see. You have to use the linework tool to set these lines to <invisible> in multiple plan views, which can get a bit tedious.

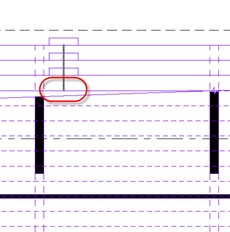
Missing Steps Plan representations work quite well. You have subcategory control of steps above the cut line, making them easy to turn off. The only issue I noticed with the step railing mentioned above is that depending on where the cutplane was set, the step before the cut line disappeared even though it should have been visible.

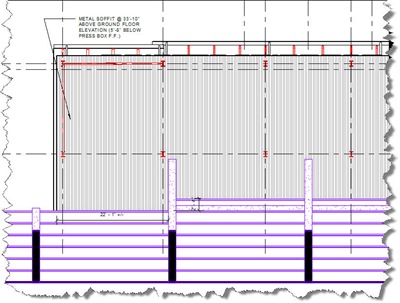
Fine-tuning the view’s cutplane made this issue less evident. The other problem I ran into was when setting up a reflected ceiling plan of the underside of the press-box. By default, Revit does not represent steps in RCP views and the user cannot control this. My workaround was to overlay a correctly oriented 3D view with only stairs showing over an RCP view in a sheet. Use the section box to crop out elements so your view matches the view range of the RCP.

RCP

Note that the raker beams that support the bleachers were built with a custom Structural Framing family to obtain the required representation. Overall, stairs have worked quite well for this particular condition and I wouldn’t hesitate to use them again in the future. Do you have other tips and suggestions? Did you find better ways to solve similar conditions? Feel free to comment on this post!


Share/Save/Bookmark